오늘은 API를 사용하여 날씨 앱을 만들어 보자.
최종 결과물은 아래와 비슷한 구성이 될 것이다.

React로 날씨앱 만들기(OpenWeather API)
앱이 실행되자마자 유저는 현재 위치의 날씨를 볼 수 있다. (지역, 온도, 날씨 상태)유저는 다른 도시의 버튼을 볼 수 있다. (현재 도시, 4개 도시)유저는 다른 도시 버튼을 클릭하면 해당 도시의
velog.io
(내가 만들고 싶은 날씨 앱과 가장 유사해 보여서 참고하게 되었다.)
날씨 앱의 특징
- 앱이 실행되면 유저 현재 위치의 날씨가 보인다.
- 날씨 정보에는 거주 도시, 섭씨, 화씨 등의 날씨 상태가 보인다.
- 그 아래 5개 정도의 버튼이 있다.(1개는 현재 위치, 4개는 다른 도시)
- 도시 버튼을 클릭할 때 마다 도시별 날씨가 나온다.
- 현재 위치 버튼을 누르면 다시 현재 위치의 날씨가 나온다.
- 데이터를 들고 오는 동안 로딩 스피너가 돌아간다.
1. 현재 위치정보 가져오기
우선, 앱이 실행되자마자 유저 위치 기반의 날씨가 보여야 하기때문에 useEffect()를 사용해야 한다.
(useEffect()는 클래스형 컴포넌트에서만 사용 가능했던 LifeCycle 메소드를
함수형 컴포넌트에서 사용할 수 있도록 도와주는 기능을 한다.)
useEffect()는 2개의 매개변수를 가진다. 1번째는 함수, 2번째는 배열을 가진다.
우리는 앱이 실행되자마자에 중점을 두어야 하기때문에
useEffect의 매개변수 중 함수만 사용하고 배열은 비워두어야 한다.
또한, 그 함수 안에서 getCurrentLoction이라는 함수를 호출 시킬 것이다.
getCurrentLoction이라는 함수는 현재 위치의 경도와 위도를 가져오는 역할을 할 것이다.
그렇다면 현재 위치를 어떻게 가져올까?
https://www.w3schools.com/html/html5_geolocation.asp
HTML Geolocation API
W3Schools offers free online tutorials, references and exercises in all the major languages of the web. Covering popular subjects like HTML, CSS, JavaScript, Python, SQL, Java, and many, many more.
www.w3schools.com
위의 사이트를 참고해서 현재 위치를 가져와 보자.
그 후에 위치를 잘 가져왔는지 console도 함께 찍어봤다.
import { useEffect,useState } from 'react';
import './App.css';

function App() {

  //위치 가져오기
  const getCurrentLocation=()=>{
    navigator.geolocation.getCurrentPosition((position)=>{
      let lat = position.coords.latitude
      let lon = position.coords.longitude
      console.log("현재 위치", lat, lon)
    })
  }

  useEffect(()=>{
    getCurrentLocation()
  },[])

  return (
    <div>
    </div>
  );
}

export default App;
(현재 위치를 잘 가져오는 걸 확인해 볼 수 있다.)
2. 현재 위치정보 기반의 날씨 가져오기
현재 위치를 알아냈으니 이것을 통해 API를 호출해 주어야 한다.
우리가 사용할 API는 OpenWeather API이다.
Сurrent weather and forecast - OpenWeatherMap
Access current weather data for any location on Earth including over 200,000 cities! The data is frequently updated based on the global and local weather models, satellites, radars and a vast network of weather stations. how to obtain APIs (subscriptions w
openweathermap.org
로그인을 하면 API 키를 발급 받을 수 있다. (로그인 없이는 API를 사용할 수 없다.)
API 창으로 와서 Current Weather Data의 API doc를 클릭한다.

그러면 아래와 같이 API를 call할 수 있는 주소가 나온다.
그 안에 우리 정보인 위도, 경도, api 키만 넣어주면 끝이다.

우선 함수 하나를 만들어 getCurrentLoction함수가 실행되면 이 함수도 같이 실행되게끔 만들어 주었다.
그 안에서 아래와 같은 코드를 작성해 주었다.
  // 위치 뽑아내기
  const getCurrentLocation=()=>{
    navigator.geolocation.getCurrentPosition((position)=>{
      let lat = position.coords.latitude
      let lon = position.coords.longitude
      getWeatherByCurrentLocation(lat, lon)
    })
  }
  //api 가져오기
  const getWeatherByCurrentLocation= async (lat, lon)=>{
    let url = `https://api.openweathermap.org/data/2.5/weather?lat=${lat}&lon=${lon}&appid=본인API키`
    let response = await fetch(url)
    let data = await response.json();
    console.log(data);
  }
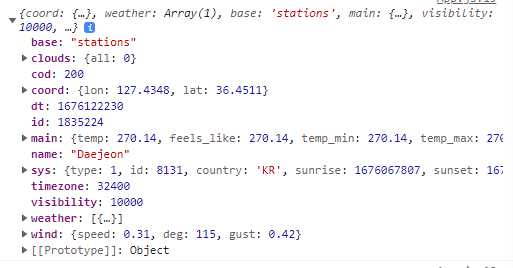
마지막에 콘솔을 찍어서 확인해 보니 많은 정보가 전달 된 것을 확인할 수 있다.
우리는 여기서 필요한 정보를 가져다가 쓰면 되는 것이다.
3. UI 만들기
API로 정보도 가져왔으니 UI에 이 정보들을 뿌려줘야 하는데
그 전에 페이지부터 꾸며보자.
우선 자신이 원하는 배경을 가져와서 화면에 깔아주고
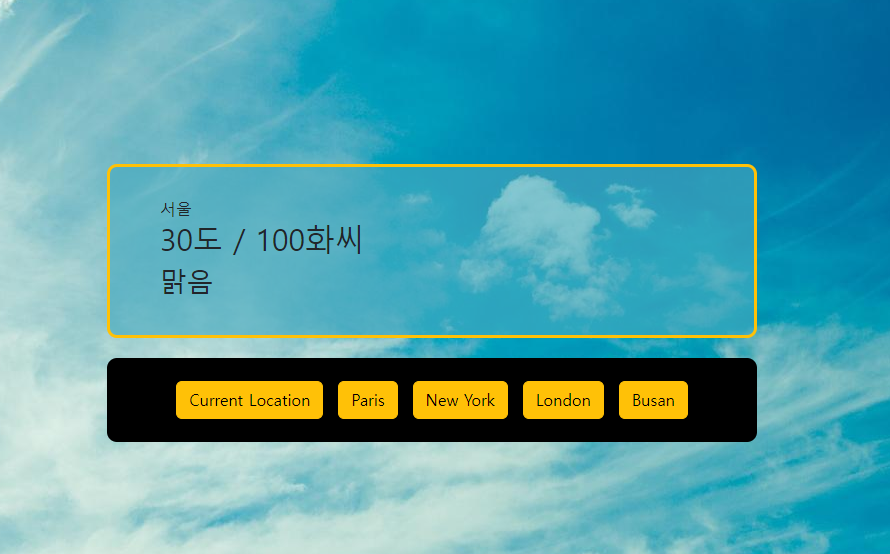
그 위에 날씨 정보를 나타내는 박스와 버튼이 모여있는 박스를 하나씩 만들어 주어야 한다.
그러기 위해 WeatherBox와 WeatherButton 이라는 컴포넌트를 만들어 주고 CSS로 꾸며 주었다.
WeatherBox.js
import React from "react";

const WeatherBox = () => {
  return (
    <div className="weather-box">
      <div>서울</div>
      <h2>30도 / 100화씨</h2>
      <h3>맑음</h3>
    </div>
  );
};

export default WeatherBox;
(일단은 아무 내용이나 넣어 보았다.)
WeatherButton.js
import React from "react";
import { Button } from "react-bootstrap";

const WeatherButton = () => {
  return (
    <div className="weather-btn">
      <Button variant="warning" className="btn">
        Current Location
      </Button>
      <Button variant="warning" className="btn">
        Paris
      </Button>
      <Button variant="warning" className="btn">
        New York
      </Button>
      <Button variant="warning" className="btn">
        London
      </Button>
      <Button variant="warning" className="btn">
        Busan
      </Button>
    </div>
  );
};

export default WeatherButton;
(일단은 아무 내용이나 넣어 보았다.)
App.css
body{
    background-image: url(https://free4kwallpapers.com/uploads/originals/2015/09/16/weather-live-wallpaper-icon.jpg);
    height: 100vh;
    background-position: center;
}

.container{
    display: flex;
    justify-content: center;
    flex-direction: column;
    align-items: center;
    height: 100vh;
}

.weather-box{
    border: 3px solid #ffc107;
    padding: 30px 50px;
    border-radius: 10px;
    margin-bottom: 20px;
    width: 650px;
    background-color: #48aac09d;
}

.weather-btn{
    border: 3px solid black;
    padding: 20px 50px;
    border-radius: 10px;
    background-color: black;
    width: 650px;
    display: flex;
    justify-content: center;
}
.btn:last-child{
    margin: 0;
}
.btn{
    margin-right: 15px;
}
비루하지만 있을건 있는 날씨 앱 UI가 완성되었다.
이제 여기에 API로 받아 온 정보들만 넣어주면 된다.
'React' 카테고리의 다른 글
| [React] reactrouter로 여러개의 웹페이지 만들기 (0) | 2023.02.20 |
|---|---|
| [React] API로 날씨 앱 만들기 2(OpenWeather API 사용) (0) | 2023.02.15 |
| [React] React로 가위 바위 보 게임 만들기 3 (0) | 2023.02.10 |
| [React] React로 가위 바위 보 게임 만들기 2 (0) | 2023.02.08 |
| [React] React로 가위 바위 보 게임 만들기 1 (0) | 2023.02.06 |


