728x90
https://conquer-it.tistory.com/194
API로 날씨 앱 만들기 1(OpenWeather API 사용)
4. 현재 위치한 날씨 데이터 보여주기
저번까지 동작은 하지 않는 UI까지 만들었다.
이제 API를 통해 이 UI가 동작하게 만들 차례이다.
이 작업은 state를 통해 진행을 해야 한다.
weather라는 state를 만들고 이것을 WeatherBox의 props로 전달해 준다.
App.js
import { useEffect,useState } from 'react';
import './App.css';
import "bootstrap/dist/css/bootstrap.min.css";
import WeatherBox from "./component/WeatherBox";
import WeatherButton from "./component/WeatherButton";

function App() {
  const [weather, setWeather] = useState(null);

  //위치 가져오기
  const getCurrentLocation = () => {
    navigator.geolocation.getCurrentPosition((position) => {
      let lat = position.coords.latitude;
      let lon = position.coords.longitude;
      getWeatherByCurrentLocation(lat, lon);
    });
  };

  const getWeatherByCurrentLocation = async (lat, lon) => {
    let url = `https://api.openweathermap.org/data/2.5/weather?lat=${lat}&lon=${lon}&appid=07c8f80150954d942a79882827366bc7&units=metric`;
    let response = await fetch(url);
    let data = await response.json();
    setWeather(data);
  };

  useEffect(() => {
    getCurrentLocation();
  }, []);

  return (
    <>
      <div className="container">
        <WeatherBox weather={weather} />
        <WeatherButton />
      </div>
    </>
  );
}

export default App;
그 후 WeatherBox에서 console로 props가 잘 전달이 되었는지 확인을 해주자.
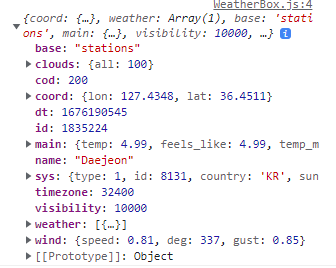
이제 가짜 데이터를 넣어던 위치에 위의 값을 넣어주면 된다.
- 현재 위치한 지역: weather.name
- 섭씨: weather.main.temp
- 화씨: weather.main.temp * 1.8 + 32
- 날씨: weather.weather[0].description
(더 많은 데이터를 가져와도 상관없다.)
import React from "react";

const WeatherBox = ({ weather }) => {
  console.log(weather);
  return (
    <div className="weather-box">
      <div>{weather?.name}</div>
      <h2>
        {weather?.main.temp}℃ / {weather?.main.temp * 1.8 + 32}℉
      </h2>
      <h3>{weather?.weather[0].description}</h3>
    </div>
  );
};

export default WeatherBox;
여기까지하면 현재 위치 기반의 날씨 정보를 불러오는데는 성공을 했다.

그렇다면 다른 지역의 날씨 데이터는 어떻게 가져올 수 있을까?
5. 버튼들 코드 다시 작성하기
다른 지역의 날씨를 가져오기 전에
우리는 다른 지역의 버튼들을 아래와 같이 작성을 했었다.
const WeatherButton = () => {
  return (
    <div className="weather-btn">
      <Button variant="warning" className="btn">
        Current Location
      </Button>
      <Button variant="warning" className="btn">
        Paris
      </Button>
      <Button variant="warning" className="btn">
        New York
      </Button>
      <Button variant="warning" className="btn">
        London
      </Button>
      <Button variant="warning" className="btn">
        Busan
      </Button>
    </div>
  );
};
물론 이렇게 해도 상관은 없지만 만약 내가 보고 싶은 도시가 100 혹은 1,000개가 된다면
일일이 하나씩 코드를 복붙해야 하는 쓸데없는 노동이 발생할 것이다.
이것을 방지하기 위해 우리는 배열함수 map을 사용할 것이다.
(map 함수는 배열에 있는 정보를 하나씩 들고 오는거라고 생각하면 된다.)
App.js에서 도시 배열을 선언하고 그 안에 값들을 넣어준다.
그 후에 WeatherButton으로 이 배열을 props로 보내면
WeatherButton에서 map함수를 통해 출력해 준다.
App.js
//생략
const cities = ["Paris", "New York", "London", "Busan"]; // 배열 선언

//생략

<WeatherButton cities={cities} /> // WeatherButton 컴포넌트
WeatherButton.js
import React from "react";
import { Button } from "react-bootstrap";

const WeatherButton = ({ cities }) => {
  console.log(cities);
  return (
    <div className="weather-btn">
      <Button variant="warning" className="btn">
        Current Location
      </Button>

	  //map 함수 이용
      {cities.map((item) => (
        <Button variant="warning" className="btn">
          {item}
        </Button>
      ))}
    </div>
  );
};

export default WeatherButton;
728x90
'React' 카테고리의 다른 글
| [React] API로 날씨 앱 만들기 3(OpenWeather API 사용) (0) | 2023.03.01 |
|---|---|
| [React] reactrouter로 여러개의 웹페이지 만들기 (0) | 2023.02.20 |
| [React] API로 날씨 앱 만들기 1(OpenWeather API 사용) (0) | 2023.02.13 |
| [React] React로 가위 바위 보 게임 만들기 3 (0) | 2023.02.10 |
| [React] React로 가위 바위 보 게임 만들기 2 (0) | 2023.02.08 |


